Dec 2 2016

Increasing productivity in your Asp.net core projects

Category: Asp.net | Asp.net core | MVCFrancesco @ 07:47

Often, during web development we complaint about the time we spend in “standard tasks” and dream of coding just our application peculiarities, thus concentrating just on our specific problem. For sure project templates and scaffolding save some “set up time” and avoid errors, but they do not save too much coding time.

In this post I’ll describe some good practices to increase web pages productivity at the price of some more set up time, and  how the new Asp.net core version of the Mvc Controls Toolkit  may help you with this. For the ones new to the Mvc Controls Toolkit, the Mvc Controls Toolkit is an open source project released with the same license of the whole Asp.net core project, so you may freely use it with no limitations and may also participate to its improvement.

The problem with most of “standard tasks” is that they are not “completely standard” so they cannot be completely automated. However, for each of them we may somehow define and automate a kind of “average task” where we can reach 90% of all actual tasks with small manual modifications. We increase further productivity if these manual modifications are achieved with name conventions, and declarations, such as, for instance, data annotations, options objects, and Tag-Helper attributes.

So for instance you might spend some set-up time to define a few “standard submit forms”, an automated procedure to create them given a few declarative information, and then use them to produce quickly, say 90%, of your views. That 90% is not a quite random number, but the result of statistics I carried out with the help of some of my customers. In fact, on the average 80-90% of all Views of a typical business application are quite standard and just 10-20% require a more complex design. In turn, among the last 10-20% just 3-7% are peculiar to the specific project since the remaining 7-13% consist of instances of general problems, so we may consider automating also part of them.

In the remainder of this post I’ll analyze different project areas that might benefit from this approach and that is worth to “attack”, pointing out the kind of automation to adopt and how the Mvc Control toolkit might help you in the task.

Business and DB Layer

The simplest optimization in this area is avoiding manual copies of DB model properties into ViewModel/DTO properties:

.Select(m => new InvoiceViewModelShow
                {
                    Id = m.Id,
                    Amount = m.Amount,
                    Reference = m.Reference,
                    FileName = m.FileName,
                    Date = m.Date,
                    Start = m.Start,
                    Stop = m.Stop,
                    ShipName = m.Ship.Name,
                    Paid = m.Paid,
                    Approved = m.Approved,
                    ....
                    ...,

                }).ToListAsync();

You might say that’s easy, with AutoMapper! Unluckily you can’t use AutoMapper since the above expression doesn’t perform a copy operation between two in-memory objects, but it is translated into an SQl query. Extracting the whole DB objects from the database and then copying them into DTO/ViewModels with AutoMapper would be unefficient, since you might extract a lot information you don’t need from the Data Base. So, the only solution is creating dynamically LinQ queries.

The MvcControlsToolkit.Core.Business Nuget package that is a completely independent part part of the Mvc Controls Toolkit contains a projection operator that do exactly this job. It uses a same name convention and nested objects like Ship.Name are mapped by concatenating all property names: Ship.Name ===> ShipName. User must specify just properties that doesn’t conform to the name convention. Expression content is not limited to a creation operator but may contain also nested conditions with several ViewModel creations in the various condition branches, like in the example below:

m => m.Maintenance == null ?
   new ProductViewModelDetail{}:
   new ProductMaintenanceViewModelDetail{
       MaintenanceYearlyRate = (decimal)m.Maintenance.YearlyRate
   }

Please notice that the ProductViewModelDetail constructor doesn’t contain any property since all properties may be inferred using the name convention.

Expressions are cached in various ways to avoid the performance cost of re-creating them each time they are used.

Please refer to the official documentation for more information.

Further speed-up may be achieved by defining generic CRUD Repositories that takes care of all main single-table operations: paged retrieval with projection on a ViewModel, detail retrieval, and all update operations that receive directly ViewModels/DTOs as parameters.

MvcControlsToolkit.Core.Business contains a DefaultCRUDRepository<Ctx, M> class where Ctx is the DB context type and M the DB model type, that is able to update automatically also entities related to M. It implements the not generic interface ICRUDRepository, so Ctx, and M may be hidden to the presentation layer. In fact all ICRUDRepository operations have the format: Add<T>, Delete<U>, Update<T>, UpdateList<T>. UpdateList<U>, etc. Where all generics are ViewModel/DTO types. Please refer to the documentation for more details, and further useful properties .

You may inherit from DefaultCRUDRepository<Ctx, M> or build your own generic class and then add also further operations that recur in several places, and with several types in your application.

Controllers

You may speed up Controller code implementation in several ways, namely:

  • By creating generics based abstract base controllers to inherit from.
  • By implementing ActionFilters for recurring controller pre/post processing.
  • By implementing MiddleWare that pre-processes all requests
  • By implementing controller utilities classes.

Base controller generics are usually ViewModels/DTOs types. In case of WebApi controllers their main purpose is handling client/server communication protocols. In fact for better modularity and reliability all application WebApi controllers should be based on well defined abstract protocols designed during your application preliminary analysis.

Also standard controllers may benefit of inheriting from base controllers with “standard action methods”, to handle recurrent “standard” Ajax update tasks , such as showing a detail show/edit modal, and updating a modified grid item.

Both type of controllers need a JavaScript library counterpart that interfaces them with the client side. So base controllers adoption factor out and “standardize” both server side and client side code.

Base controllers “standard” action methods may be connected with problem specific business logic either by calling protected virtual methods the inheriting controller may override, or by accepting implementations of "standard" repository interfaces as constructor arguments. Generic Repository interfaces may be instantiated by problem specific implementations passed by the inheriting controllers, which in turn receive them in their constructors through dependency injection.

At moment Mvc Controls toolkit contains just a single standard ServerCrudController<VMD, VMS, D> controller that offers Ajax assistance to Views showing item lists. More specifically, it offers automatic Ajax assistance to pages in-line Ajax item updates, and in showing detail Show/Edit modals. VMD is the item detail ViewModel type , VMS the in-line item ViewModel, and D the principal key type of both of them.

ServerCrudController<VMD, VMS, D> uses the ICRUDRepository interface to communicate with the business layer, but it has also various properties and methods the inheriting controller may override to customize further action methods behavior. For detail please refer to the official documentation.

In future versions we will add also WebApi controllers implementing useful protocols, as well as facilities to get easily filtering and sorting conditions passed in the query string in OData format.

SercerCrudController is a good example of how to use a standard controller, and how to connect it with business logics:

public class CGridsController :
    ServerCrudController<ProductViewModelDetail,
        ProductViewModel, int?>
{
    public CGridsController(ProductRepository repository,
        IStringLocalizerFactory factory, IHttpContextAccessor accessor)
        : base(factory, accessor)
    {
        Repository = repository;
    }
    public async Task<IActionResult> Products(int? page)
    {
        int pg = page.HasValue ? page.Value : 1;
        if (pg < 1) pg = 1;

        var model = new ProductlistViewModel
        {
            Products = await Repository.GetPage<ProductViewModel>(
            null,
            q => q.OrderBy(m => m.Name),
            pg, 5)
        };
        return View(model);
    }      
}

repository of type ProductRepository injected with DI in the inheriting controller constructor is assigned to the Repository base controller property of type ICRUDRepository. This is enough to connect ServerCrudController  ajax-assistance action methods to the application business logic. Then, we add the Action Method that prepares data for the View that is enhanced with Ajax assistance.

For sure base generic controllers are the most powerful tool to factor out controller code, but request pre/post processing with either MiddleWare  or per-controller ActionFilters may ensure further improvements and contribute to a cleaner modular design. If you have doubts about how to implement your pre/post processing consider that with the new Asp.net core 1.1 MiddlewareFilter you may use any MiddleWare also as an Action filter. Examples of how useful request pre/post processing code is factored-out by Middleware are: authentication cookies processing, culture selection processing, and in general user preferences processing discussed in the last section of this post. In the next version of the Mvc Controls Toolkit we will add Middleware for processing also filtering/sorting information contained in the query string in OData format.

Views

Usage of standard templates that render data according to ViewModel data annotations and/or parameters drastically reduces the development time, and contribute to Web Pages standardization. In turn, Web pages standardization reduce the time needed for a user to learn how to use the web application.  One may increase, the “scope” of a template by allowing the developer to customize part, of it, as for instance, how a single property is rendered.

Mvc Controls Toolkit templates rendering is organized around RowTypes and Columns. RowTypes contain overall infos and templates for rendering a whole data item while Columns contain infos and templates for rendering a single property. RowTypes templates call Column templates, so the developer may provide “standard” RowTypes and Column templates, and then on each page he/she may control how to display data items by providing adequate settings for RowType/Columns, and by providing some custom Column template. RowTypes, and Colum settings are automatically extracted from data annotations and property types but user my override them by providing supplementary infos in RowType/Column description TagHelpers.

Here an example of an edit form rendered with a standard bootstrap-based layout and whose settings are entirely extracted from data annotations and property types.Order, input are displayed is based on the Order property of the DisplayAttribute, while the number of Bootstrap grid system slots assigned to each input is based on percentage width specifications contained in ColumnLayoutAttributes. Developer may provide specifications for several screen widths. The kind of input is selected automatically by the standard Column template based on the property type/DataTypeAttribute. So, for instance,  enums are rendered with a selects and boolean with a checkboxes.The above detail-form TagHelper uses global templates defined with partial views inside the Mvc Controls Toolkit dlls. However, in general, user may specify the name of a different partial view, or the name of a ViewComponent  in the detail-form  tag itself. The developer may also override globally the standard template Partial Views by adding Partial Views with the same names in the Shared folder.

Here an example where rendering has been customized with the help of row-type and column TagHelpers. The exterrnal-key-remote tag specifies that the TypeId property contains an external key, and provides all needed information for the user to select the right key value with an autocomplete, by typing the display names associated to the various keys. Settings specified in the row-type tag are applied only if the ViewModel is the ProductMaintenanceViewModelDetail subclass of the  ProductViewModelDetail base ViewModel, otherwise settings specified directly in the detail-form tag are applied.

Here “standard templates” featuring a grid with edit in-line Ajax capabilities based on the Ajax assistance furnished by the ServerCrudController<VMD, VMS, D>.

User options

Another area where you may achieve further development-time optimizations is User option handling. Having, a centralized register containing all user options with the possibility to inject them where needed via dependency injection may help to factor out some code and simplify  your overall design. Basically you may have  user options sources and stores all attached to an unique global per-request register. Sources may be input fields, url parameters and cookies for unlogged user and User Claims or custom tables for logged users. Cookies, User Claims, and custom tables may work also as stores where to save user options received through input fields or url parameters.

The MvcControlsToolkit.Core.Options nuget package (that is a completely independent part of the Mvc Controls Toolkit) offers all services described above. You may collect user options provided through input forms or url parameters without writing controller code since they are automatically processed by MvcControlsToolkit.Core.Options middleware. Then you may save them in cookies, user claims and/or custom tables with no need to write any code. Developer may configure all above services with a few simple declarative options in the MvcControlsToolkit.Core.Options middleware. It is a typical example of how MiddleWare may speed up controllers development.

For more information please refer to the official documentation.


That’s all for now!

More examples and tutorials in posts to come!

Francesco


.


Tags: , , ,

Jul 17 2016

Available Asp.net core version of the Mvc Controls Toolkit Live Examples!

New 1.0.1 bugs fix release of the Mvc Controls toolkit! Available also Live Examples at this link!

Enjoy!  & Stay tuned

In a short time ajax update server grid and batch update server grid

Francesco

Tags: , , , ,

Jul 1 2016

Ap.net Core 1.0.0 RTM Version of the Mvc Controls Toolkit Ready

Category: Asp.net core | WebApi | MVC | Htnl5 fallback | Asp.netFrancesco @ 20:00

The first Asp.net Core 1.0.0 RTM release of the Mvc Controls Toolkit is available for download! This is the link that explains how to install it, while a starting example may be downloaded here. Pay attention! You must follows all installation steps also for running the example, since the example among other things has also the purpose of becoming familiar with installation, and configuration stuffs.

Enjoy!  & Stay tuned

In a short time tutorials, live examples, and a complete documentation web site

Francesco

Tags: , , ,

Jun 25 2016

Ap.net Core Rc2 Version of the Mvc Controls Toolkit Ready

Category: Asp.net core | WebApi | Htnl5 fallback | MVC | Asp.netFrancesco @ 02:40

The first Asp.net Core Rc2 release of the Mvc Controls Toolkit is available for download! This is the link that explains how to install it, while a starting example may be downloaded here. Pay attention! You must follows all installation steps also for running the example, since the example among other things has also the purpose of becoming familiar with installation, and configuration stuffs.

Enjoy!  & Stay tuned

In a short time tutorials, live examples, and a complete documentation web site

Francesco

Tags: , , ,

Nov 20 2015

New Mvc6 Controls Toolkit

Category: TypeScript | JavaScript | MVC | Asp.netFrancesco @ 04:50

Web development changed dramatically in the last few years and the Mvc Controls Toolkit team run after all changes to offer a state of the art toolkit, but now it is time to redesign the whole toolkit from the scratch! JavaScript world evolved, and web applications reliy always more on client side techniques. New JavaScript frameworks appears and evolve quickly, thus the need of a better separation between server side and client side world. The new Mvc 6 Controls Toolkit answers to these new Web Development boundaries are: TypeScript, a better separation of JavaScript world coordinated with server side C# code through trans-compilation of C# classes and attributes, native support of the most common client side frameworks like Angular.js, and Knockout.js, and open support for other client side framework by means of providers,…and more!


Please leave you feedback on the specifications of the new Mvc 6 Controls Toolkit!


Francesco

Tags: , , , , , , ,

Oct 31 2015

Building Complex Controls with Asp.Net MVC 6 TagHelpers

Category: Asp.net | MVCFrancesco @ 04:09

Asp.Net Mvc 6 proposes a new option to Html Helpers: Tag Helpers. Tag Helpers are similar to Html Helpers but they use an Html tags – like syntax. Basically, they are custom tags with custom attributes that are translated into standard Html tags during server side Razor processing.

They are somehow similar to Html5 custom elements but they are processed on the server side, so they don’t need JavaScript to work properly and their code is visible to search engine robots. Html 5 elements are not fully supported by all main browsers, but they are somehow simulated on all browsers by several JavaScript frameworks, like, for instance, Knockout.js.

Thus, one might plan to build TagHelper based Mvc controls that create their final Html either on the server side or on the client side with the help of a JavaScript framework that supports custom elements. More specifically, the same Razor View might generate either the final Html or some custom elements based code to be interpreted on the client side by a JavaScript framework, depending on some settings specified either in the View itself, or in the controller, or in some configuration file. Both server and client side generation have their vantages and disadvantages(among them server controls are visible to search engines, but client controls are more flexible), so the possibility to change between them without changing the Razor code appears very interesting.

This post is not a basic tutorial on Tag Helpers, but a tutorial on how to implement advanced template based controls, like grids, menus, or tree-views with TagHelpers. An introduction to TagHelpers is here; please read it if you are new to custom Tag Helpers implementation.

This tutorial assume you have:

  1. A Visual Studio 2015 based development environment. If you have not installed VS 2015, yet, please refer to my previous post on how to build your VS 2015 based development environment.
  2. Asp.Net 5 beta8 installed. Instructions on how to move to beta8 may be found here.


Template Based Controls

Complex controls like TreeViews and Grids use templates to specify how each node/row is rendered. Usually, they have also default templates, so the developer needs to specify templates just for the “pieces” that need custom rendering. For instance, in the case of a grid a developer wishing to use the default row template might need to specify templates just for a few columns that need custom rendering. Controls may allow several more custom templates, such as a custom pager template, a custom header template, a footer template and so on.

In this tutorial I’ll show just the basic technique for implementing templates with TagHelpers. For this purpose we define a simple <iterate>…</iterate> TagHelper that instantiates a template on all elements of an IEnumerable. Moreover, all inputs field created in the output Html will have the right names for the Model Binder to read back the IEnumerable when the form containing the <iterate> tag is submitted (see here if you are new to model binding to an IEnumerable).

The Test Project

Open VS 2015 and select: File –> New –> Project…
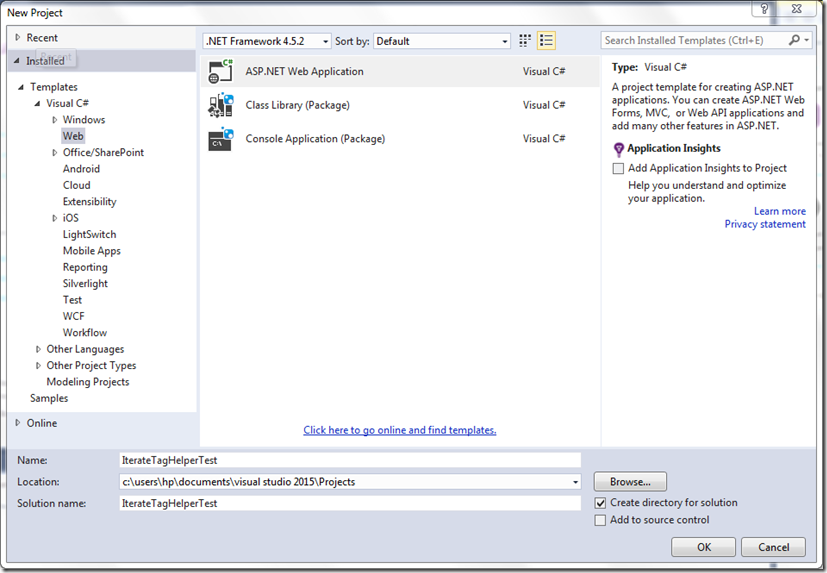
Project

Now select “ASP.NET Web Application” and call the project “IterateTagHelperTest” (please use exactly the same name, otherwise you will not be able to use my code “as it is”  because of  namespace mismatches).
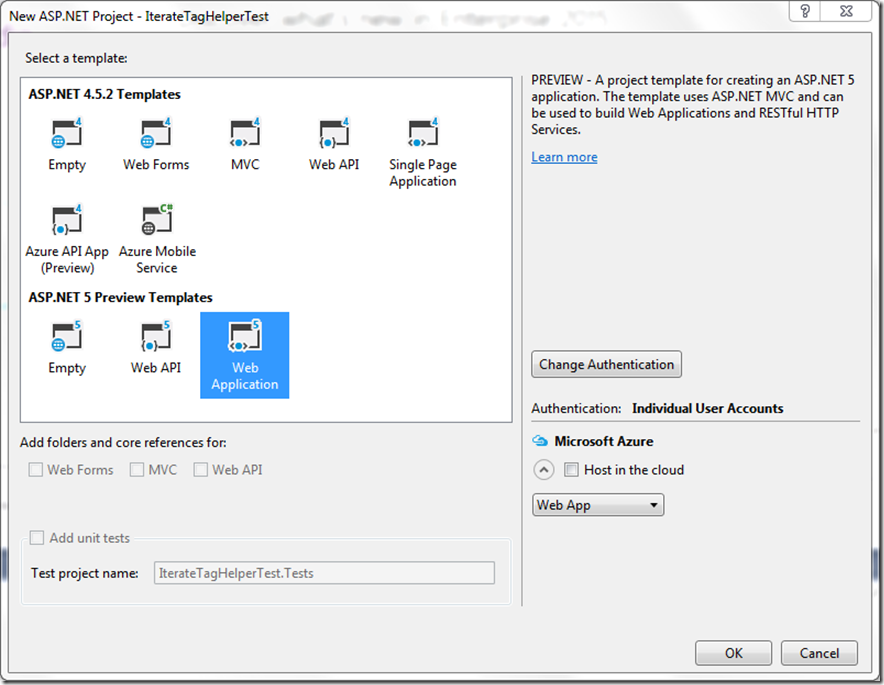
MVC6

Now choose “Web Application” under “ASP.NET Preview Templates”, and click “OK” without changing anything else.


We will test our new TagHelper with a new View handled by the HomeController.

We need a ViewModel, so as a first step go to the “ViewModels” folder and add a child folder named “Home” for all HomeController ViewModels.

Then add a new class called “TagTestViewModel.cs” to this folder.

Finally, delete the code created by the scaffolder and add the following code:

  1. using System;
  2. using System.Collections.Generic;
  3. using System.Linq;
  4. using System.Threading.Tasks;
  5.  
  6. namespace IterateTagHelperTest.ViewModels.Home
  7. {
  8.     public class Keyword
  9.     {
  10.         public string Value { get; set; }
  11.         public Keyword(string value)
  12.         {
  13.             Value = value;
  14.         }
  15.         public Keyword()
  16.         {
  17.             
  18.         }
  19.  
  20.     }
  21.     public class TagTestViewModel
  22.     {
  23.         public IEnumerable<Keyword> Keywords { get; set; }
  24.     }
  25. }

It is a simple ViewModel containing an IEnumerable to test our iterate TagHelper.

Now move to the HomeController and add the following using:

  1. using IterateTagHelperTest.ViewModels.Home;


Then add a Get and a Post action methods to test our TagHelper (without modifying all other action methods):

  1. [HttpGet]
  2. public IActionResult TagTest()
  3. {
  4.     return View(new TagTestViewModel
  5.     {
  6.         Keywords = new List<Keyword> {
  7.         new Keyword("ASP.NET"),
  8.         new Keyword("MVC"),
  9.         new Keyword("Tag Helpers") }
  10.     });
  11. }
  12. [HttpPost]
  13. public IActionResult TagTest(TagTestViewModel model)
  14. {
  15.     return View(model);
  16. }


Now go to the Views/Home folder and add a new View for the newly created action methods. Call it “TagTest” to match the action methods name.

Remove the default code and substitute it with:

  1. @model IterateTagHelperTest.ViewModels.Home.TagTestViewModel
  2. @{
  3.     ViewBag.Title = "Tag Test";
  4. }
  5.  
  6. <h2>@ViewBag.Title</h2>

We will insert the remainder of the code after the implementation of our TagHelper. Now we need just a title to run the application and test that everything we have done works properly.

Before testing the application we need a link to reach the newly defined View. Open the Views/Shared/_Layout.cshtml default layout page and locate the Main Menu:


  1. <ul class="nav navbar-nav">
  2.     <li><a asp-controller="Home" asp-action="Index">Home</a></li>
  3.     <li><a asp-controller="Home" asp-action="About">About</a></li>
  4.     <li><a asp-controller="Home" asp-action="Contact">Contact</a></li>
  5. </ul>


And add a new menu item for the newly created page:

  1. <ul class="nav navbar-nav">
  2.     <li><a asp-controller="Home" asp-action="Index">Home</a></li>
  3.     <li><a asp-controller="Home" asp-action="About">About</a></li>
  4.     <li><a asp-controller="Home" asp-action="Contact">Contact</a></li>
  5.     <li><a asp-controller="Home" asp-action="TagTest">Test</a></li>
  6. </ul>

Now run the application and click on the “Test” top menu item: you should go to our newly created test page with title “Tag Test”.

Now that our test environment is ready we may move to the TagHelper implementation!

Handling Template Current Scope

A template is the whole Razor code enclosed within a template-definition TagHelper. For instance, in the case of a grid we might have a <column-template asp-for=”….”> </column-template > TagHelper that encloses custom column templates, a <header-template > </header-template > that encloses custom header templates, and so on. Since our simple <iteration> TagHelper,  includes a single template we will take the whole <iteration> TagHelper content as template. In the case, of more complex controls the main control TagHelper  usually includes several children template-definition TagHelpers.

According to our previous definition, each template may contain both: tags, Razor instructions and variable definitions. Since the same template is typically  called several time  we need a way to ensure that the scope of all Razor variables is limited to the template itself. Moreover, all asp-for attributes inside the template must not refer to the Razor View ViewModel but to the current model the template is being instantiated on.

Something like:

  1.      <iterate asp-for="Keywords">
  2.          @using (var s = Html.NextScope<Keyword>())
  3.          {
  4.              var m = s.M;
  5.              <div class="form-group">
  6.                  <div class="col-md-10">
  7.                             <input asp-for="@m().Value" class="form-control" />
  8.                  </div>
  9.              </div>
  10.          }
  11.      </iterate>

should do the job. Where Html.NextScope<Keyword>() takes the the current scope passed by the father <iterate> TagHelper put it in a variable, and makes it the active scope. s.M() takes the current model from the current scope. s.M must be a function to avoid that m is included in the input names(Keyword[i].m.Value, instead of the correct Keyword[i].Value).

When the template execution is terminated the scope object is disposed, and its dispose method removes it form the top of the scopes stack, and re-activate the previously active scope, if any(we need a stack, because templates might nest).

The <iteration> TagHelper  takes the list of Keywords thanks to its asp-for=”Keywords” attribute, and call the template on each object of the list:

  1. foreach (var x in model)
  2. {
  3.     TemplateHelper.DeclareScope(ViewContext.ViewData, x, string.Format("{0}[{1}]", fullName, i++));
  4.     sb.Append((await context.GetChildContentAsync(false)).GetContent());
  5.    
  6. }

The TemplateHelper.DeclareScope helper basically put all scope information into an item of the Razor View ViewData dictionary, where the previously discussed Html.NextScope method can take it. The current scope contains the current model, and the HtmlPrefix to be added to all names. In our case Keywords[0]…Keywords[n]. This way all input controls will have names like “Keywords[i].Value”, instead of simply “Value”. This is necessary for model binding to work properly when the form is submitted.

When the scope is activated by Html.NextScope  the HtmlPrefix is temporarily put into the TemplateInfo.HtmlFieldPrefix field of the Razor View ViewData dictionary. This is enough to ensure, it  automatically prefixes all names. When the current scope is deactivated  the previous TemplateInfo.HtmlFieldPrefix value is restored.

In the next two sections i give all implementation details of both the scope stack , and of the <iterate> TagHelper.

Implementing the Scope Stack

We insert the Scope Stack code in a new folder. Go to the Web Project root and add a new folder called HtmlHelpers.

We start with the definition of an interface containing all scope informations. Under the previously created HtmlHelpers folder add a new interface called ITemplateScope.cs. Then substitute the scaffolded code with:

  1. using System;
  2. using System.Collections.Generic;
  3. using System.Linq;
  4. using System.Threading.Tasks;
  5. using Microsoft.AspNet.Mvc.ViewFeatures;
  6.  
  7. namespace IterateTagHelperTest.HtmlHelpers
  8. {
  9.     public interface ITemplateScope : IDisposable
  10.     {
  11.         string Prefix { get; set; }
  12.         ITemplateScope Father { get; set; }
  13.     }
  14.     public interface ITemplateScope<T> : ITemplateScope
  15.     {
  16.         Func<T> M { get; set; }
  17.     }
  18. }

The interface contains a generic that will be instantiated with the template model type. The model is returned by a function in order to get the right names inside the template (this way all names start from the first property after the function, see previous section). All members that do not depend from the generic are grouped into the not-generic interface ITemplateScope, the final interface inherit from. Moreover, ITemplateScope inherit from IDisposable since it must be used within a using statement. Together with the model the scope contains the current HtmlPrefix(see previous section), and a pointer to the father scope(this way, a template has access also to the father template model in case of nested templates).

Now we are ready to implement the Html.NextScope<T>   and TemplateHelper.DeclareScope methods. The whole implementation is based on an active scopes stack whose stack items are instances of a class that is declared private inside the TemplateHelper static class:

private class templateActivation
{
    public string HtmlPrefix { get; set; }
    public object Model { get; set; }
    public ITemplateScope Scope { get; set; }
}

The class contains the father HtmlPrefix to restore when the scope is deactivated, a not-generic pointer to the scope interface, and the scope model as an object since the model is not accessible through the ITemplateScope interface. The same class is used to pass scope information among method calls.

The DeclareScope method store new scope information in the ViewData dictionary

private const string lastActivation = "_template_stack_";


public static void DeclareScope(ViewDataDictionary vd, object model, string newHtmlPrefix)
{
    var a = new templateActivation
    {
        Model = model,
        HtmlPrefix = newHtmlPrefix
    };
    vd[lastActivation] = a;
}

Then NextScope<T> takes it to activate a new scope:

private const string lastActivation = "_template_stack_";
private const string externalActivation = "_template_external_";


public static ITemplateScope<T> NextScope<T>(this IHtmlHelper helper)
{
    var activation = helper.ViewContext.ViewData[lastActivation] as templateActivation;
    if (activation != null)
    {
        helper.ViewContext.ViewData[lastActivation] = null;
        var stack = helper.ViewContext.ViewData[templateStack] as Stack<templateActivation>;
        ITemplateScope father = null;
        if (stack != null && stack.Count > 0)
        {
            father = stack.Peek().Scope;
        }
        if (father == null)
        {
            father = helper.ViewContext.ViewData[externalActivation] as ITemplateScope;
        }
        return new TemplateScope<T>(helper.ViewContext.ViewData, activation)
        {
            M = () => (T)(activation.Model),
            Prefix = activation.HtmlPrefix,
            Father = father
        };
    }
    else return null;
}

If a newly created scope is found a new instance of the TemplateScope<T> class that implements the ITemplateScope<T> class is created. The TemplateScope<T> class is declared as private inside the TemplateHelper class. The stack is accessed just to find the father ITemplateScope. If the stack is empty the method try to get the father scope from another ViewData entry, that might be used to keep activation information across partial view calls(not implemented in this example).

The stack push is handled in the TemplateScope<T> constructor:

  1. public TemplateScope(ViewDataDictionary vd, templateActivation a)
  2. {
  3.     this.vd = vd;
  4.     a.Scope = this;
  5.     PushTemplate(a);
  6.  
  7. }

While the stack pop is handled by the TemplateScope<T> Dispose method:

  1. public void Dispose()
  2. {
  3.     PopTemplate();
  4. }

In order to add the whole implementation described above to your project, go to the previously created HtmlHelpers folder and add a class called TemplateHelper.cs. Then replace the scaffolded code by the code below:

  1. using System;
  2. using System.Collections.Generic;
  3. using System.Linq;
  4. using System.Threading.Tasks;
  5. using Microsoft.AspNet.Mvc.Rendering;
  6. using Microsoft.AspNet.Mvc.ViewFeatures;
  7.  
  8. namespace IterateTagHelperTest.HtmlHelpers
  9. {
  10.  
  11.     public static class TemplateHelper
  12.     {
  13.         private const string templateStack = "_template_stack_";
  14.         private const string lastActivation = "_template_stack_";
  15.         private const string externalActivation = "_template_external_";
  16.         private class templateActivation
  17.         {
  18.             public string HtmlPrefix { get; set; }
  19.             public object Model { get; set; }
  20.             public ITemplateScope Scope { get; set; }
  21.         }
  22.         private class TemplateScope<T> : ITemplateScope<T>
  23.         {
  24.  
  25.  
  26.             public TemplateScope(ViewDataDictionary vd, templateActivation a)
  27.             {
  28.                 this.vd = vd;
  29.                 a.Scope = this;
  30.                 PushTemplate(a);
  31.  
  32.             }
  33.             private ViewDataDictionary vd;
  34.             public string Prefix { get; set; }
  35.             public Func<T> M { get; set; }
  36.             public ITemplateScope Father { get; set; }
  37.             public void Dispose()
  38.             {
  39.                 PopTemplate();
  40.             }
  41.             private void PushTemplate(templateActivation a)
  42.             {
  43.                 var activation = new templateActivation
  44.                 {
  45.                     HtmlPrefix = vd.TemplateInfo.HtmlFieldPrefix,
  46.                     Model = a.Model,
  47.                     Scope = a.Scope
  48.                 };
  49.                 var stack = vd[templateStack] as Stack<templateActivation> ?? new Stack<templateActivation>();
  50.                 stack.Push(activation);
  51.                 vd[templateStack] = stack;
  52.                 vd.TemplateInfo.HtmlFieldPrefix = a.HtmlPrefix;
  53.             }
  54.             private void PopTemplate()
  55.             {
  56.                 var stack = vd[templateStack] as Stack<templateActivation>;
  57.                 if (stack != null && stack.Count > 0)
  58.                 {
  59.                     vd.TemplateInfo.HtmlFieldPrefix = stack.Pop().HtmlPrefix;
  60.                 }
  61.             }
  62.         }
  63.         public static void DeclareScope(ViewDataDictionary vd, object model, string newHtmlPrefix)
  64.         {
  65.             var a = new templateActivation
  66.             {
  67.                 Model = model,
  68.                 HtmlPrefix = newHtmlPrefix
  69.             };
  70.             vd[lastActivation] = a;
  71.         }
  72.         public static ITemplateScope<T> NextScope<T>(this IHtmlHelper helper)
  73.         {
  74.             var activation = helper.ViewContext.ViewData[lastActivation] as templateActivation;
  75.             if (activation != null)
  76.             {
  77.                 helper.ViewContext.ViewData[lastActivation] = null;
  78.                 var stack = helper.ViewContext.ViewData[templateStack] as Stack<templateActivation>;
  79.                 ITemplateScope father = null;
  80.                 if (stack != null && stack.Count > 0)
  81.                 {
  82.                     father = stack.Peek().Scope;
  83.                 }
  84.                 if (father == null)
  85.                 {
  86.                     father = helper.ViewContext.ViewData[externalActivation] as ITemplateScope;
  87.                 }
  88.                 return new TemplateScope<T>(helper.ViewContext.ViewData, activation)
  89.                 {
  90.                     M = () => (T)(activation.Model),
  91.                     Prefix = activation.HtmlPrefix,
  92.                     Father = father
  93.                 };
  94.             }
  95.             else return null;
  96.         }
  97.     }
  98. }

Now we are ready to move to the TagHelper implementation.

Implementing the <iteration> TagHelper

Go to the root of the web Project and add a folder called TagHelpers, then add a new class called IterateTagHelper.cs to this folder. Substitute the scaffolded code with the code below:

  1. using Microsoft.AspNet.Mvc.Rendering;
  2. using Microsoft.AspNet.Razor.Runtime.TagHelpers;
  3. using System.Text;
  4. using Microsoft.AspNet.Mvc.ViewFeatures;
  5. using System.Threading.Tasks;
  6. using System.Collections;
  7. using IterateTagHelperTest.HtmlHelpers;
  8.  
  9.  
  10. namespace IterateTagHelperTest.TagHelpers
  11. {
  12.     [HtmlTargetElement("iterate", Attributes = ForAttributeName)]
  13.     public class IterateTagHelper : TagHelper
  14.     {
  15.         private const string ForAttributeName = "asp-for";
  16.         [HtmlAttributeNotBound]
  17.         [ViewContext]
  18.         public ViewContext ViewContext { get; set; }
  19.         [HtmlAttributeName(ForAttributeName)]
  20.         public ModelExpression For { get; set; }
  21.  
  22.         public override async Task ProcessAsync(TagHelperContext context, TagHelperOutput output)
  23.         {
  24.             var name = For.Name;
  25.             var fullName = ViewContext.ViewData.TemplateInfo.GetFullHtmlFieldName(name);
  26.             IEnumerable model = For.Model as IEnumerable;
  27.             output.TagName = string.Empty;
  28.             StringBuilder sb = new StringBuilder();
  29.             if (model != null)
  30.             {
  31.                 int i = 0;
  32.                 foreach (var x in model)
  33.                 {
  34.                     TemplateHelper.DeclareScope(ViewContext.ViewData, x, string.Format("{0}[{1}]", fullName, i++));
  35.                     sb.Append((await context.GetChildContentAsync(false)).GetContent());
  36.  
  37.                 }
  38.             }
  39.             output.Content.SetContentEncoded(sb.ToString());
  40.  
  41.         }
  42.  
  43.     }
  44. }

Tag attributes are mapped to properties with the help of the HtmlAttributeName attribute, and are automatically populated when the IterateTagHelper instance is created. The asp-for attribute that in our case selects the collection to iterate on is mapped into the For property whose type is ModelExpression. As a result of the match a ModelExpression instance containing the collection, and its name is created.

The ViewContext property is not mapped to any tag attribute since it is decorated with the HtmlAttributeNotBound attribute. Instead it is populated with the Razor View ViewContext since it is decorated with the ViewContext attribute. We need the View ViewContext to extract the View ViewData dictionary.

The remainder of the code is straightforward:

  1. We get the name of the asp-for bound property.
  2. We add a possible HtmlPrefix to the above name by calling the GetFullHtmlFieldName method. We need it to pass the right HtmlPrefix to the scope of each IEnumerable element. Without the right prefix the collection can’t be bound by the receiving Action Method when the form is submitted.
  3. We extract the collection and cast it to the right type.
  4. Since we don’t want to enclose all template instantiations within a container we set the output.TagName to the empty string.
  5. We create a StringBuilder to build our content.
  6. For each IEnumerable element we create a new scope with the right HtmlPrefix, and the we get the element HTML by calling GetChildContentAsync. We pass a false argument to avoid that the method might return the previously cached string(otherwise we would obtain N copies of HTML of the first collection element).
  7. Finally we set the string created by chaining all children HTML as a tag content by calling the SetContentEncoded method. The Encoded postfix avoids that the string be HTML encoded.

Importing HtmlHelper and TagHelper

Now we need to import our Html Helper and our TagHelper. We may import them either locally in each View using them or globally by adding the import instructions to the Views/_ViewImports.cshtml View. Before the addition the Views/_ViewImports.cshtml file should look like this:

  1. @using IterateTagHelperTest
  2. @using IterateTagHelperTest.Models
  3. @using IterateTagHelperTest.ViewModels.Account
  4. @using IterateTagHelperTest.ViewModels.Manage
  5. @using Microsoft.AspNet.Identity
  6. @addTagHelper "*, Microsoft.AspNet.Mvc.TagHelpers"

Add:

@using IterateTagHelperTest.HtmlHelpers
@addTagHelper "*, IterateTagHelperTest"

To get:

@using IterateTagHelperTest
@using IterateTagHelperTest.Models
@using IterateTagHelperTest.ViewModels.Account
@using IterateTagHelperTest.ViewModels.Manage
@using Microsoft.AspNet.Identity
@addTagHelper "*, Microsoft.AspNet.Mvc.TagHelpers"
@using IterateTagHelperTest.HtmlHelpers
@addTagHelper "*, IterateTagHelperTest"

The @addTagHelper "*, IterateTagHelperTest" instruction imports all TagHelpers contained in the Web Site dll(whose name is IterateTagHelperTest).

Testing our TagHelper

No we may finally test our TagHelper. Opens the previously defined Views/Home/TagTest.cshtml View and replace its content with the content below:

@model IterateTagHelperTest.ViewModels.Home.TagTestViewModel
@using IterateTagHelperTest.ViewModels.Home
@{
    ViewBag.Title = "Tag Test";
}

<h2>@ViewBag.Title</h2>
<div>
    <form asp-controller="Home" asp-action="TagTest" method="post" class="form-horizontal" role="form">

        <iterate asp-for="Keywords">
            @using (var s = Html.NextScope<Keyword>())
            {
                var m = s.M;
                <div class="form-group">
                    <div class="col-md-10">
                        <input asp-for="@m().Value" class="form-control" />
                    </div>
                </div>
            }
        </iterate>
        <div class="form-group">
            <div class="col-md-offset-2 col-md-10">
                <button type="submit" class="btn btn-default">Submit</button>
            </div>
        </div>
    </form>
</div>

Now run the application, and click the “Test” main menu item to go our test page. You should see something like:
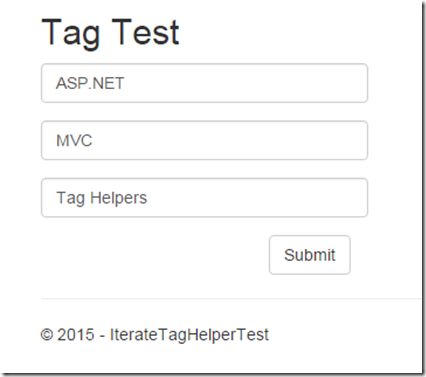
TestPage

The TagHelper actually instantiates the template all over the Keywords IEnumerable! The input field names appears correct:


Names

Let put a breakpoint in the receiving Action Method of the HomeController to verify that the IEnumerable is bound properly:
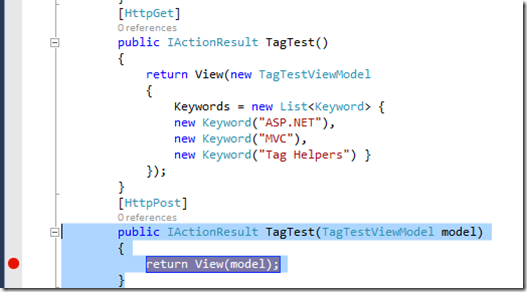
 

breakpoint


Now let modify a little our Keywords and let submit the form. When the breakpoint is hit let inspect the received model:


ModelBinding


That’s all for now! The whole project may be downloaded here.

Comments are disabled to avoid spamming, please use my contact form to send feedback:

Stay Tuned!

Francesco

Tags: , , ,

Mar 20 2013

Single Page Applications 3: TreeIterator

Category: Asp.net | MVCFrancesco @ 23:08

Data Moving Plugin Controls

Data Moving Plugin Styling

Data Moving Plugin Forms: Detail Views, Data Filtering UI, and Undo/Redo Stack

Single Page Applications 1: Manipulating the Client Side ViewModel

Single Page Applications 2: Validation Error Handling

Single Page Applications 3: TreeIterator

Client templates instantiation is one of the techniques used to implement SPA applications: The initial page contains just a minimum Html, and the remainder of the Html is created dynamically by instantiating client templates on data items. Typically, template instantiations are triggered by actions executed by javascript code. The Data Moving Plug-in offers a simple way to create dynamically all Html of a SPA, in a declarative data-driven fashion. The TreeIterator helper scans a hierarchical data structure and decides  which template to use for each data element it meets during this processing. The developer is required to provide just a list of templates, and a function that selects a template given a data item. After that, the provided templates are used as building blocks to produce the whole UI of the page (or of a part of the page) as soon as a new client ViewModel(or a new part of it, such as a Workspace) is sent to the client side.

Since the Mvc Controls Toolkit, and consequently the Data Moving Plug-in that is built on top of it, are able to compile any Razor template into a client side template, we can put everything in the templates provided to the TreeIterator: paged grids and/or complex controls such as Dual selects , or whole Data Moving Forms.

We will see how the TreeIterator works with a simple example: automatically building a multipage JQuery mobile menu based on nested lists, from the information contained in a hierarchy of objects. We will use the Mvc Controls Toolkit SimpleMenuItem class to define each menu item:

  1. public class SimpleMenuItem
  2. {
  3.     public SimpleMenuItem();
  4.  
  5.     public List<SimpleMenuItem> Children { get; set; }
  6.     public string Link { get; set; }
  7.     public string Target { get; set; }
  8.     public string Text { get; set; }
  9.     public string UniqueName { get; set; }
  10. }


As first step we declare all needed templates:

  1. var menuTemplates = h.DeclareClientTemplates("mobile_menu")
  2.                 .Add<SimpleMenuItem>(
  3.                 @<ul data-role="listview" id="menuRoot">
  4.                         @item.RecurIterationOn(m => m.Children)
  5.                               </ul>
  6.                 )
  7.                 .Add<SimpleMenuItem>(
  8.                 @<li >
  9.                         @item._D(m => m.Text)           
  10.                 </li>
  11.                 )
  12.                 .Add<SimpleMenuItem>(
  13.                 @<li >
  14.                     @item.LinkFor(m => m.Text, m => m.Link)            
  15.                 </li>
  16.                 )
  17.                 .Add<SimpleMenuItem>(
  18.                 @<li >
  19.                     @item.LinkFor(m => m.Text, m => m.Link, target: m => m.Target)          
  20.                 </li>
  21.                 )
  22.                 .Add<SimpleMenuItem>(
  23.                 @<li >
  24.                     @{var mitem = item.ViewData.Model;}
  25.                     @item._D(m => m.Text)
  26.                     <ul data-role="listview">
  27.                         @item.RecurIterationOn(m => m.Children)
  28.                                     </ul>
  29.                 </li>
  30.                 );

This task is easily accomplished with the fluent interface of the DeclareClientTemplates helper. The unique argument of this helper is the templates base name. All templates are named by adding an integer suffix to this base name: the firts template is named “mobile_menu0”, the second one “mobile_menu1”, and so on.

Our first template defines the startup template, that is, the initial template that starts the rendering. The startup template is not necessarily the first one, but the startup template is declared in the call to the TreeIterator helper.

Then we have the template to use for displaying pure text, then the template of a menu item that links to a target page, then then the template of a menu item that links to a target page to be opened in a new browser window, and finally the template to be used for a menu item that has sub-menu items.

As you can see both the startup template and the last template call RecurIteration on the children of the current SimpleMenuItem. This is the way the TreeIterator visits recursively, the whole data structure. In general, each, template may contains several calls to RecurIteration if the object has several children arrays.

Once we have defined all templates we need just to render them:

  1. @menuTemplates.Render("menuTemplateChoice")

The single argument of the Render method is the name of the javascript function that selects the template to use for each data item:

  1. function menuTemplateChoice(item) {
  2.     if ((!item.Children()) || item.Children().length == 0) {
  3.         if (item.Link()) {
  4.             return item.Target() ? 'mobile_menu3' : 'mobile_menu2';
  5.         }
  6.         else return 'mobile_menu1'
  7.     }
  8.     else return 'mobile_menu4';
  9. }

The above code is self-explanatory.

Finally, we may call the TreeIterator helper that "will do the job”:

  1. @h.ClientTreeIteratorFor(m => m, "mobile_menu0", "listviewAfterRender")

The first argument is the root of the objects hierarchy, the second argument is the name of the startup template, and finally the third argument is a javascript function to be called after the whole objects hierarchy has been rendered. In our case the listviewAfterRender javascript function enhances the <ul> <li> nested list created by the ClientTreeIteratorFor transforming them into a JQuery mobile nested listview:

  1. function listviewAfterRender() {
  2.         $('#menuRoot').hide();
  3.         setTimeout(function () { $('#menuRoot').listview(); $('#menuRoot').show(); });
  4.     }

The nice part, is that as soon as we substitute the root of the objects hierarchy with a different data item the UI of the menu is changed immediately to reflect the new settings.

In this example all templates were pre-rendered in the host Html page, however, in more complex multi-page applications templates may be organized in modules and loaded dynamically together with AMD javascript modules.

The video below shows the menu working:


That’ all for now!

Stay tuned and give a look also to all other Data Moving Plug-in introductory tutorials and videos

                      Francesco

Tags: , , , , , ,

Mar 19 2013

Single Page Applications 2: Validation Error Handling

Category: MVC | Asp.netFrancesco @ 22:30

Data Moving Plugin Controls

Data Moving Plugin Styling

Data Moving Plugin Forms: Detail Views, Data Filtering UI, and Undo/Redo Stack

Single Page Applications 1: Manipulating the Client Side ViewModel

Single Page Applications 2: Validation Error Handling

Single Page Applications 3: TreeIterator

This is the second half of the tutorial Single Page Applications 1: Manipulating the Client Side ViewModel that describes the enhancements added to the standard asp.net Mvc validation error engine by the Data Moving Plug-in. We advice to assist the video associated to this introductory tutorial before reading it:

In the Data Moving Plug-in validation rules, and error handling are coded with the usual tools of Asp.net Mvc, such as Data Annotations (or Fluent validation), by adding errors to the ModelState, etc. Also client side validation is based on the jquery validation plug-in. However, all this tools have been enhanced in several ways. First of all, server errors are returned also as a result of JSon updates, and dispatched to the right places in the UI (thanks to the updatesManagers that handle the updates). Moreover, also elements that are detached from the Dom, and rendered again by instantiating  client templates “remember” their error state thanks to parallel data structures that takes care of this “job”.

Probably, the more interesting enhancement is “error bubbling”. What is “error bubbling”? Suppose you need to report an error to the property AllProgrammers[1].EMail, that is to the Email of the second programmer of the programmers list. Well, since the grid has no visible Email column, the error cant be shown! In order to overcome this problem the error is bubbled up to the whole entity level:  AllProgrammers[1]. Now since we added an error column to the programmers grid the user can see the second programmer has an error:

  1. .AddErrorColumn(m => m, "*", width: 20)

Since we put m => m the error column is triggered by whole entity level errors. This way also errors in fields that are not shown in a grid row can be signalled to the user. Error bubbling is useful also in TreeViews/TreeGrids because an error happening in a child entity is signalled also in its father entity, so the user may open the right branch of the tree to find the children entity in error.

Error bubbling is automatically applied to both the errors returned by the server and to client side validation errors.

What if the user want to know exactly which among the fields that are not shown in the grid is in error in order to correct the error? Simple! He just shows the entity in error in a detail view, and thanks to the errors synchronization behavior with detail views provided by the data moving plug-in he will see the error in the detail view!

Another interesting feature is Error Filtering. All Data Moving plug-in controls that have been enhanced with a retrievalManager, have error filtering capabilities. This means, they respond to a “show just entity in error” filtering command that can be issued with a button in a toolbar. This way the user can review all errors by browsing the list of all entities in error.

Everything works properly because the Data Moving engine “remembers” the error state of a field also if the entity the field in error belongs to is removed from the Dom, for instance, because of paging.

In order to minimize the round-trips to the server the Data Moving Plug-in offers the possibility to add entity level validation rules, and whole Core Workspace validation rules directly on the client side.

Below the addition of an entity level validation rule to the programmers updatesManager:


  1. TeamBuilding.programmersUpdater.options({ itemErrors: function (x) {
  2.         if (x.CanBeTeamLeader() && (!x.Experience() || x.Experience() < 7))
  3.             return ["A 7 years experience is required to be a Team Leader"];
  4.         else return null;
  5.     }
  6.     });

Validation errors are specified through a function that receives an entity as argument and returns an array of errors. Error dispatching in the adequate place of the UI is done automatically by the Data Moving plug-in engine.

Below the definition of a Core Workspace level validation rule in the whole Workspace updatesManager:

  1. TeamBuilding.ClientModel, "ProposedTeam", TeamBuilding.DestinationModel, "ProposedTeam",
  2. { updatersIndices: [TeamBuilding.programmersUpdater, TeamBuilding.artistsUpdater],
  3.     {
  4.     ......
  5.     ......
  6.     Errors: function (model) {
  7.         if (model.LeaderProgrammer() && model.LeaderArtist()) return null;
  8.         else return ["The team is incomplete"];
  9.     }
  10. });

We can also specify an error callback that is invoked with a data structure containing information on the errors as argument whenever there are errors in the Workspace :

  1. onObjectErrors: function (errorObjects) {
  2.                  alert("Click the error button to show errors that are not visible on the screen");
  3.              }

That’ all for now!

Stay tuned and give a look also to all other Data Moving Plug-in introductory tutorials and videos

                      Francesco

Tags: , , , , , , ,

Mar 17 2013

Data Moving Plugin Forms: Detail Views, Data Filtering UI, and Undo/Redo Stack

Category: MVC | Asp.netFrancesco @ 23:38

Data Moving Plugin Controls

Data Moving Plugin Styling

Data Moving Plugin Forms: Detail Views, Data Filtering UI, and Undo/Redo Stack

Single Page Applications 1: Manipulating the Client Side ViewModel

Single Page Applications 2: Validation Error Handling

Single Page Applications 3: TreeIterator

Data Moving Forms provide standard detail, edit and filter views, but they can be customized with any Html. Moreover, all actions performed in edit mode can be undone and re-done with the typical editors undo/ redo buttons. The developer can either provide a custom column template or the whole edit, detail or filter templates. Forms may work either stand-alone or attached to the items of a grid, TreeView or of any other control. They provide filtering, editing and detail capabilities to a single model or to a collection of items. You may see Data Moving Plugin Forms working in the following video associated to this tutorial:

When Forms are attached to another control they import all settings (columns definitions, detail, edit detail templates, etc.) from a row definition of that control through the DetailFilterBuilder method of the fluent row definition interface:

  1. .........
  2. .DetailFilterBuilder(out detailBuilder, modelName: "GridExample.EditDetail.ViewModel", undoredo: "GridExample.EditDetail.undoRedo")
  3. .........

In this case we passed also the name of the overall page client ViewModel properties where to store respectively the Form client ViewModel and the undo/redo object, because we decided to create a form with client side capabilities.

The detailBuilder object already contains all information that are needed to render all input fields because they were imported from the row definition object that invoked the DetailFilterBuilder method. However we may continue customizing our form by adding toolbars, buttons, Titles, etc:

  1. @{
  2.         detailBuilder.DeclareViews(true, true, true)
  3.            .OnClose("GridExample.unselectItem")
  4.            .EncloseInValidationForm()
  5.            .StartToolbar(ShowToolbarIn.All).RowContainerLevel(ItemContainerLevel.Row)
  6.                   .StartTextColumn("Human Resource Detail", "Edit Human Resource", "Filter Human Resources ").NoWrap(true).EndColumn()
  7.                   .AddButtonToolbar(ShowButtonIn.Filter, CommandButtonType.Filter)
  8.                   .AppendButton(ShowButtonIn.Display, CommandButtonType.GoEdit)
  9.                   .AppendButton(ShowButtonIn.Edit, CommandButtonType.GoDisplay)
  10.                   .AppendButton(ShowButtonIn.Edit, CommandButtonType.Save, "validate close")
  11.                   .AppendButton(ShowButtonIn.Edit, CommandButtonType.Undo)
  12.                   .AppendButton(ShowButtonIn.Edit, CommandButtonType.Redo)
  13.                   .EndButtons()
  14.            .EndToolBar()
  15.            .DeclareDialog(new MVCControlsToolkit.Controls.DataGrid.Dialog { CloseOnEscape = true, Draggable = true, Resizable = true, MinWidth = 320, Width = 320, Title = "Human Resources" });
  16.     }

The three true in the DeclareViews method declare that we need both Filter, Edit and Detail views. The OnClose method specifies a javascript action to perform when the dialog is closed; in our case the javascript function removes  a Css class from the item the form was attached to in order to edit or to show the item details. EncloseInValidationForm encloses the edit view into an html form and enables client side validation on all form fields.

Then we define a toolbar that contains a text column with a short description of each view (detail, edit,and filter), and several buttons. The first parameter of each button definition specifies which view the button will appear in, while the second parameter specifies the action to be performed by the button. The definition of the save button has a third argument containing two parameters to be passed to the save action: validate and close. This way when the user saves its changes the form is validated and the dialog window that contains the form is closed.

Finally, the DeclareDialog method requires to enclose the form within a Dialog window.

Once we have finished the form definition we can render it with:

  1. @detailBuilder.Render()

The resulting Edit and Filter views are:

EditForm


and

FilterView

As you can see the edit view contains 3 string fields and an image field. The undo-redo buttons work like the undo and redo buttons of a standard text editor: they allow to undo and redo all changes done to the input fields.  All four column definitions have been imported from the grid row definition, with no need to specify any custom template. The filter view, instead, contains just two columns: Name and Surname, because these are the only columns that required the filtering (and sorting) services through the Queries method:

  1. .StartColumn(t => t.Name, width: 46, widthIsPercentage: true).Queries(true, true).HorizontalAlign(MVCControlsToolkit.Controls.Core.HAlign.center).EndColumn()
  2. .StartColumn(t => t.Surname, width: 46, widthIsPercentage: true).Queries(true, true).HorizontalAlign(MVCControlsToolkit.Controls.Core.HAlign.center).EndColumn()


A form can be defined also as a stand-alone control, without importing the row definition from another control. Also in this case the form can be attached to one or more other controls by exploiting a feature called dynamicEdit that is able to handle concurrent access to the same form from different controls. The form containing just a tinyMce editor in the E-Mail examples of the Data Interactions and Dragging video uses dynamicEdit to work as a text editor for various fields of various controls in the page.


Below the definition of a stand-alone form with some custom column definition:

  1.       var h = Html.SendToClient(m => m, "FormExample.ClientViewModel", undoRedo: "FormExample.formUndoRedo");
  2.       h.DeclareStringArray(new string[] { "no", "yes" }, "standardBoolean", true);
  3.       var formR = h.FormFor(m => m)
  4.           .TopHtmlAttributes(new { @class = JQueryUICssClasses.ContentContainer })
  5.           .OnOperationExecuting("customCommands")
  6.           .StartToolbar()
  7.           .RowContainerLevel(ItemContainerLevel.Row)
  8.               .AddButtonToolbar(ShowButtonIn.Edit, CommandButtonType.GoDisplay)
  9.               .AppendButton(ShowButtonIn.Display, CommandButtonType.GoEdit)
  10.               .AppendButton(ShowButtonIn.Edit, CommandButtonType.Reset)
  11.               .AppendButton(ShowButtonIn.Edit, CommandButtonType.UndoAllSteps)
  12.               .AppendButton(ShowButtonIn.Edit, CommandButtonType.Undo)
  13.               .AppendButton(ShowButtonIn.Edit, CommandButtonType.Redo)
  14.               .AppendButton(ShowButtonIn.Edit, CommandButtonType.RedoAllsteps)
  15.               .AppendButton(ShowButtonIn.Both, CommandButtonType.Custom, "operation-submit").Texts("Submit")
  16.           .EndButtons().EndToolBar()
  17.           .AddRowType()
  18.               .AddColumn(m => m.Title)
  19.               .AddColumn(m => m.Description)
  20.               .StartColumn(m => m.Date).CustomTemplateFixed(TemplateType.DetailEdit,
  21.                   @<text>
  22.                   @item.TypedTextBoxFor(m => m.Date,
  23.                       new {data_role_default=DateTime.Today.ToString()},
  24.                       GenericCssClasses.Watermark,
  25.                       ContentAlign.Left,
  26.                       calendarOptions: new CalendarOptions())
  27.                   </text>)
  28.             .EndColumn()
  29.             .StartColumn(m => m)
  30.             .CustomTemplateFixed(TemplateType.DetailEdit,
  31.               @<div class='ui-widget-content custom-column'>
  32.                   <h4>@item.LabelFor(m => m.EnableComments)</h4>
  33.                   @item.CheckBoxFor(m => m.EnableComments)
  34.                   &nbsp;
  35.                   <h4>@item.LabelFor(m => m.Publish)</h4>
  36.                   @item.CheckBoxFor(m => m.Publish)
  37.               </div>)
  38.             .EditDetailColumnCompletelyCustom()
  39.             .CustomTemplateFixed(TemplateType.DetailDisplay,
  40.               @<div class="ui-widget-content custom-column">
  41.                   <h4>@item.LabelFor(m => m.EnableComments)</h4>
  42.                   @item._D(m => m.EnableComments, null, "standardBoolean")
  43.                   &nbsp;
  44.                   <h4>@item.LabelFor(m => m.Publish)</h4>
  45.                   @item._D(m => m.Publish, null, "standardBoolean")
  46.               </div>)
  47.              .DetailColumnCompletelyCustom()
  48.             .EndColumn()
  49.             .AddColumn(m => m.Tags)
  50.             .StartColumn(m => m.Content)
  51.               .CustomTemplateFixed(TemplateType.DetailEdit,
  52.                   @<div class="ui-widget-content custom-column content-container">
  53.                       <div class='left-content'>
  54.                           @item.DualSelectExtFor(m => m.Categories).ImportDefault(DefaultScope.Named, "DetailDualSelect").Header("Categories").ContainerHtmlAttributes(new { @class = "dual-select-column" }).ControlAttributes(new { data_role_default = "0" }).Render(item.CreateChoiceList(m => m.AllCategories, m => m.Id, m => m.Description))
  55.                       </div>
  56.                       <div class='right-content'>
  57.                           @item.TextAreaFor(m => m.Content, new{data_element_type="tinyMCE", rows=20, @class="tinyMCE"})
  58.                            
  59.                       </div>
  60.                   </div>)
  61.               .EditDetailColumnCompletelyCustom()
  62.               .CustomTemplateFixed(TemplateType.DetailDisplay,
  63.                   @<div class="ui-widget-content custom-column content-container">
  64.                         <divdata-bind="html: Content" class='display-content'></div>
  65.                       
  66.                       <h4>Categories: </h4>
  67.                       <span data-bind = "text: FormExample.displayCategories(Categories())"></span>
  68.                       
  69.                       
  70.                   </div>)
  71.              .DetailColumnCompletelyCustom()
  72.             .EndColumn()
  73.           .EndRowType();
  74.   }
  75.  
  76.   @Html.ValidationSummary()
  77.   @formR.Render()

The SendToClient Html helper manages everything is needed to transfer the whole ViewModel to the Client Side, in order to take advantage of client side techniques; It returns an html helper that is able to render controls with client side capabilities. Then, we render a javascript array of strings to be used to display the values of boolean fields.

h.FormFor(m => m) starts the actual Form definition.

TopHtmlAttributes specifies the Css class of the form container. OnOperationExecuting specifies a custom javascript handler for the click button events of the form toolbars. In our case this handler just recognizes the operation-submit custom button command that submits the whole Html page to the server, and then pass the control to the default button click handler that handles all other standard buttons.

Then we have a toolbar definition similar to the one we have already seen in the previous example.

Now since the form is stand-alone we have to provide the columns definitions. For the first two columns we use the standard template. For the Date field we specify a custom template just for the edit view. This is necessary to provide a value for the data-role-default Html5 attributes This attribute declares the default value a field must be set to when the user clicks the form reset button in the edit view (CommandButtonType.Reset). When no such attribute is provided a standard value that depends just on the field data type is used (This suffices in most of the cases).

Then we have an anonymous column (m => m) that we use for the two small boolean fields EnableComments and Publish. In this case we specify both edit and detail custom templates. The edit template is based on two checkboxes, while the detail template uses the array of strings (“no”, “yes”) we previously rendered. The EditDetailColumnCompletelyCustom method call avoids that the html produced by these two templates is enclosed within a standard column container Html.

The Tags column uses standard column templates, while the Content column specifies both edit and detail custom templates. The edit template contains a DualSelect that enables the user to select categories from a pre-existing list and a TextArea that is enhanced with the tinyMce text editor. The detail template contains a div with an html knockout binding to display the html produced by tinyMce, and a text knockout binding that displays all categories selected by the user.

The resulting Edit View is:

StandAloneEdit

While the resulting display view is:

StandAloneDisplay

That’ all for now!

Stay tuned and give a look also to all other Data Moving Plugin introductory tutorials and videos

                                                      Francesco

Tags: , , , ,

Mar 16 2013

Data Moving Plugin Styling

Category: Asp.net | MVCFrancesco @ 00:00

Data Moving Plugin Controls

Data Moving Plugin Styling

Data Moving Plugin Forms: Detail Views, Data Filtering UI, and Undo/Redo Stack

Single Page Applications 1: Manipulating the Client Side ViewModel

Single Page Applications 2: Validation Error Handling

Single Page Applications 3: TreeIterator

The Data Moving Plug-in supports both the Jquery UI and the JQuery Mobile styling frameworks. Moreover, the developer has the option to customize the standard Jquery UI, or JQuery Mobile styling, and/or to define new styling frameworks. Different styling options can be mixed in the same page, and also in the same control.

Styling settings are contained in instances of the class MVCControlsToolkit.Controls.CssSettings, and can be activated by calling the static method void CssSettings.Define( CssSettings x). Once activated the styling settings are used in the rendering of all Data Moving Plug-in controls, till a new instance of CssSettings is activated.

If we need to activate new settings only for a few lines of code, after which we need to return to the previous settings we may use the two static methods: CssSettings.Begin( CssSettings x).  and CssSettings.End().

Style settings include information, on how to style normal content, header content, buttons, alternate grids rows, etc. The Data Moving Plug-in comes with three predefined style settings:

  • CssSettingsJQueryUI: It uses JQuery UI  Css classes to style Data Moving Plug-in Controls.
  • CssSettings.JQueryMobile: It uses JQuery Mobile Css classes to style Data Moving Plug-in Controls.
  • CssSettings.JQueryMobileExt: It uses JQuery Mobile Css classes + an extended set of icons (see here) to style Data Moving Plug-in Controls.

JQuery Mobile settings need some parameters that may be provided with the Specify method:

  1. CssSettings.JQueryMobileExt.Specify("b", "a", "e", "e")

The first parameter is the swatch to use for the normal content, the second parameter the swatch for the headers, the third parameter the swatch to use for all clickable elements (mainly buttons), and the last parameter is the swatch for the alternate grid rows.

The developer may customize the default settings either by filling a custom instance of the CssSettings class (or an instance of a custom subclass of it), or by changing just some properties of an existing CssSettings instance with the help of the CssSettings Modify(Action<CssSettings> changes) method.

For instance we would like to change just the alternate row grid class we may write:

  1. CssSettings.Define(CssSettings.JQueryUI.Modify(m => { m.DefaultAlternateClass = "myClass"; }));

Below a grid styled with CssSettingsJQueryUI:

DesktopGrid

And a similar grid styled with CssSettings.JQueryMobileExt:

MobileGrid

In the CssSettings.JQueryMobileExt Grid we used different swatches to render the buttons in the header (black buttons) and the buttons in the normal rows(yellow buttons). In fact yellow buttons in the header would have been unacceptable because of the yellow/black contrast, while yellow buttons on the normal  rows are nice. This result has been obtained by changing the settings of the toolbar and of the headers of the grid:

  1. .StartToolbar(false)
  2.     .CustomCssSettings(CssSettings.JQueryMobileExt.Specify("b", "a", "a", "e"))
  3.     .RowContainerLevel(ItemContainerLevel.Row)
  4.     .RowHeight("3em", true)
  5.     .AddButtonToolbar(ShowButtonIn.Both, CommandButtonType.FilterWindow).ColumnWidth(40).EndButtons()
  6.     .AddPagerColumn("FullCompletePager")
  7. .EndToolBar()


  1. .CustomCssSettingsHeaderFooter(CssSettings.JQueryMobileExt.Specify("b", "a", "a", "e"))

Below a video showing some Data Moving Plug-in controls styled in different ways:

That’ all for now!

Stay tuned and give a look also to all other Data Moving Plugin introductory tutorials and videos

                      Francesco

Tags: , , , , , ,